
Đăng lúc: Th03 20, 2026 - 198 Lượt xem
How to Choose a Projector for Studio: A Step-by-Step 2026 Guide
You need a projector that fits a professional studio environment, but the spec sheet reads like a foreign language. Brightness numbers clash with throw ratio formulas, and every manufacturer claims "cinema-grade" performance. If you are evaluating options for a production studio, a broadcasting setup, or a corporate AV installation, you face a maze of incompatible standards and vague marketing claims. This guide cuts through the noise. We walk you through the exact criteria that separate a studio-ready projector from a consumer-grade impulse buy, and we give you a repeatable framework to compare models on your shortlist.
TL;DR
- Identify your throw distance and screen size first—projector placement determines 60% of your buying criteria.
- Prioritize lumen output adjusted for ambient light, not raw ANSI lumens alone.
- Match the projector’s native resolution and color gamut to your content workflow (Rec. 709, DCI-P3, or Rec. 2020).
- Verify certification requirements and supplier lead times before committing to an OEM or ODM partner.
- Use a side-by-side spec comparison table to eliminate models that fail two or more hard requirements.
How to Choose a Projector for Studio: Matching Specs to Your Workflow
Choosing a projector for studio use starts with mapping your physical space and content output to the right technical profile. A mismatch here costs more than money—it costs production time and client trust.
Step 1: Define Throw Distance and Room Geometry
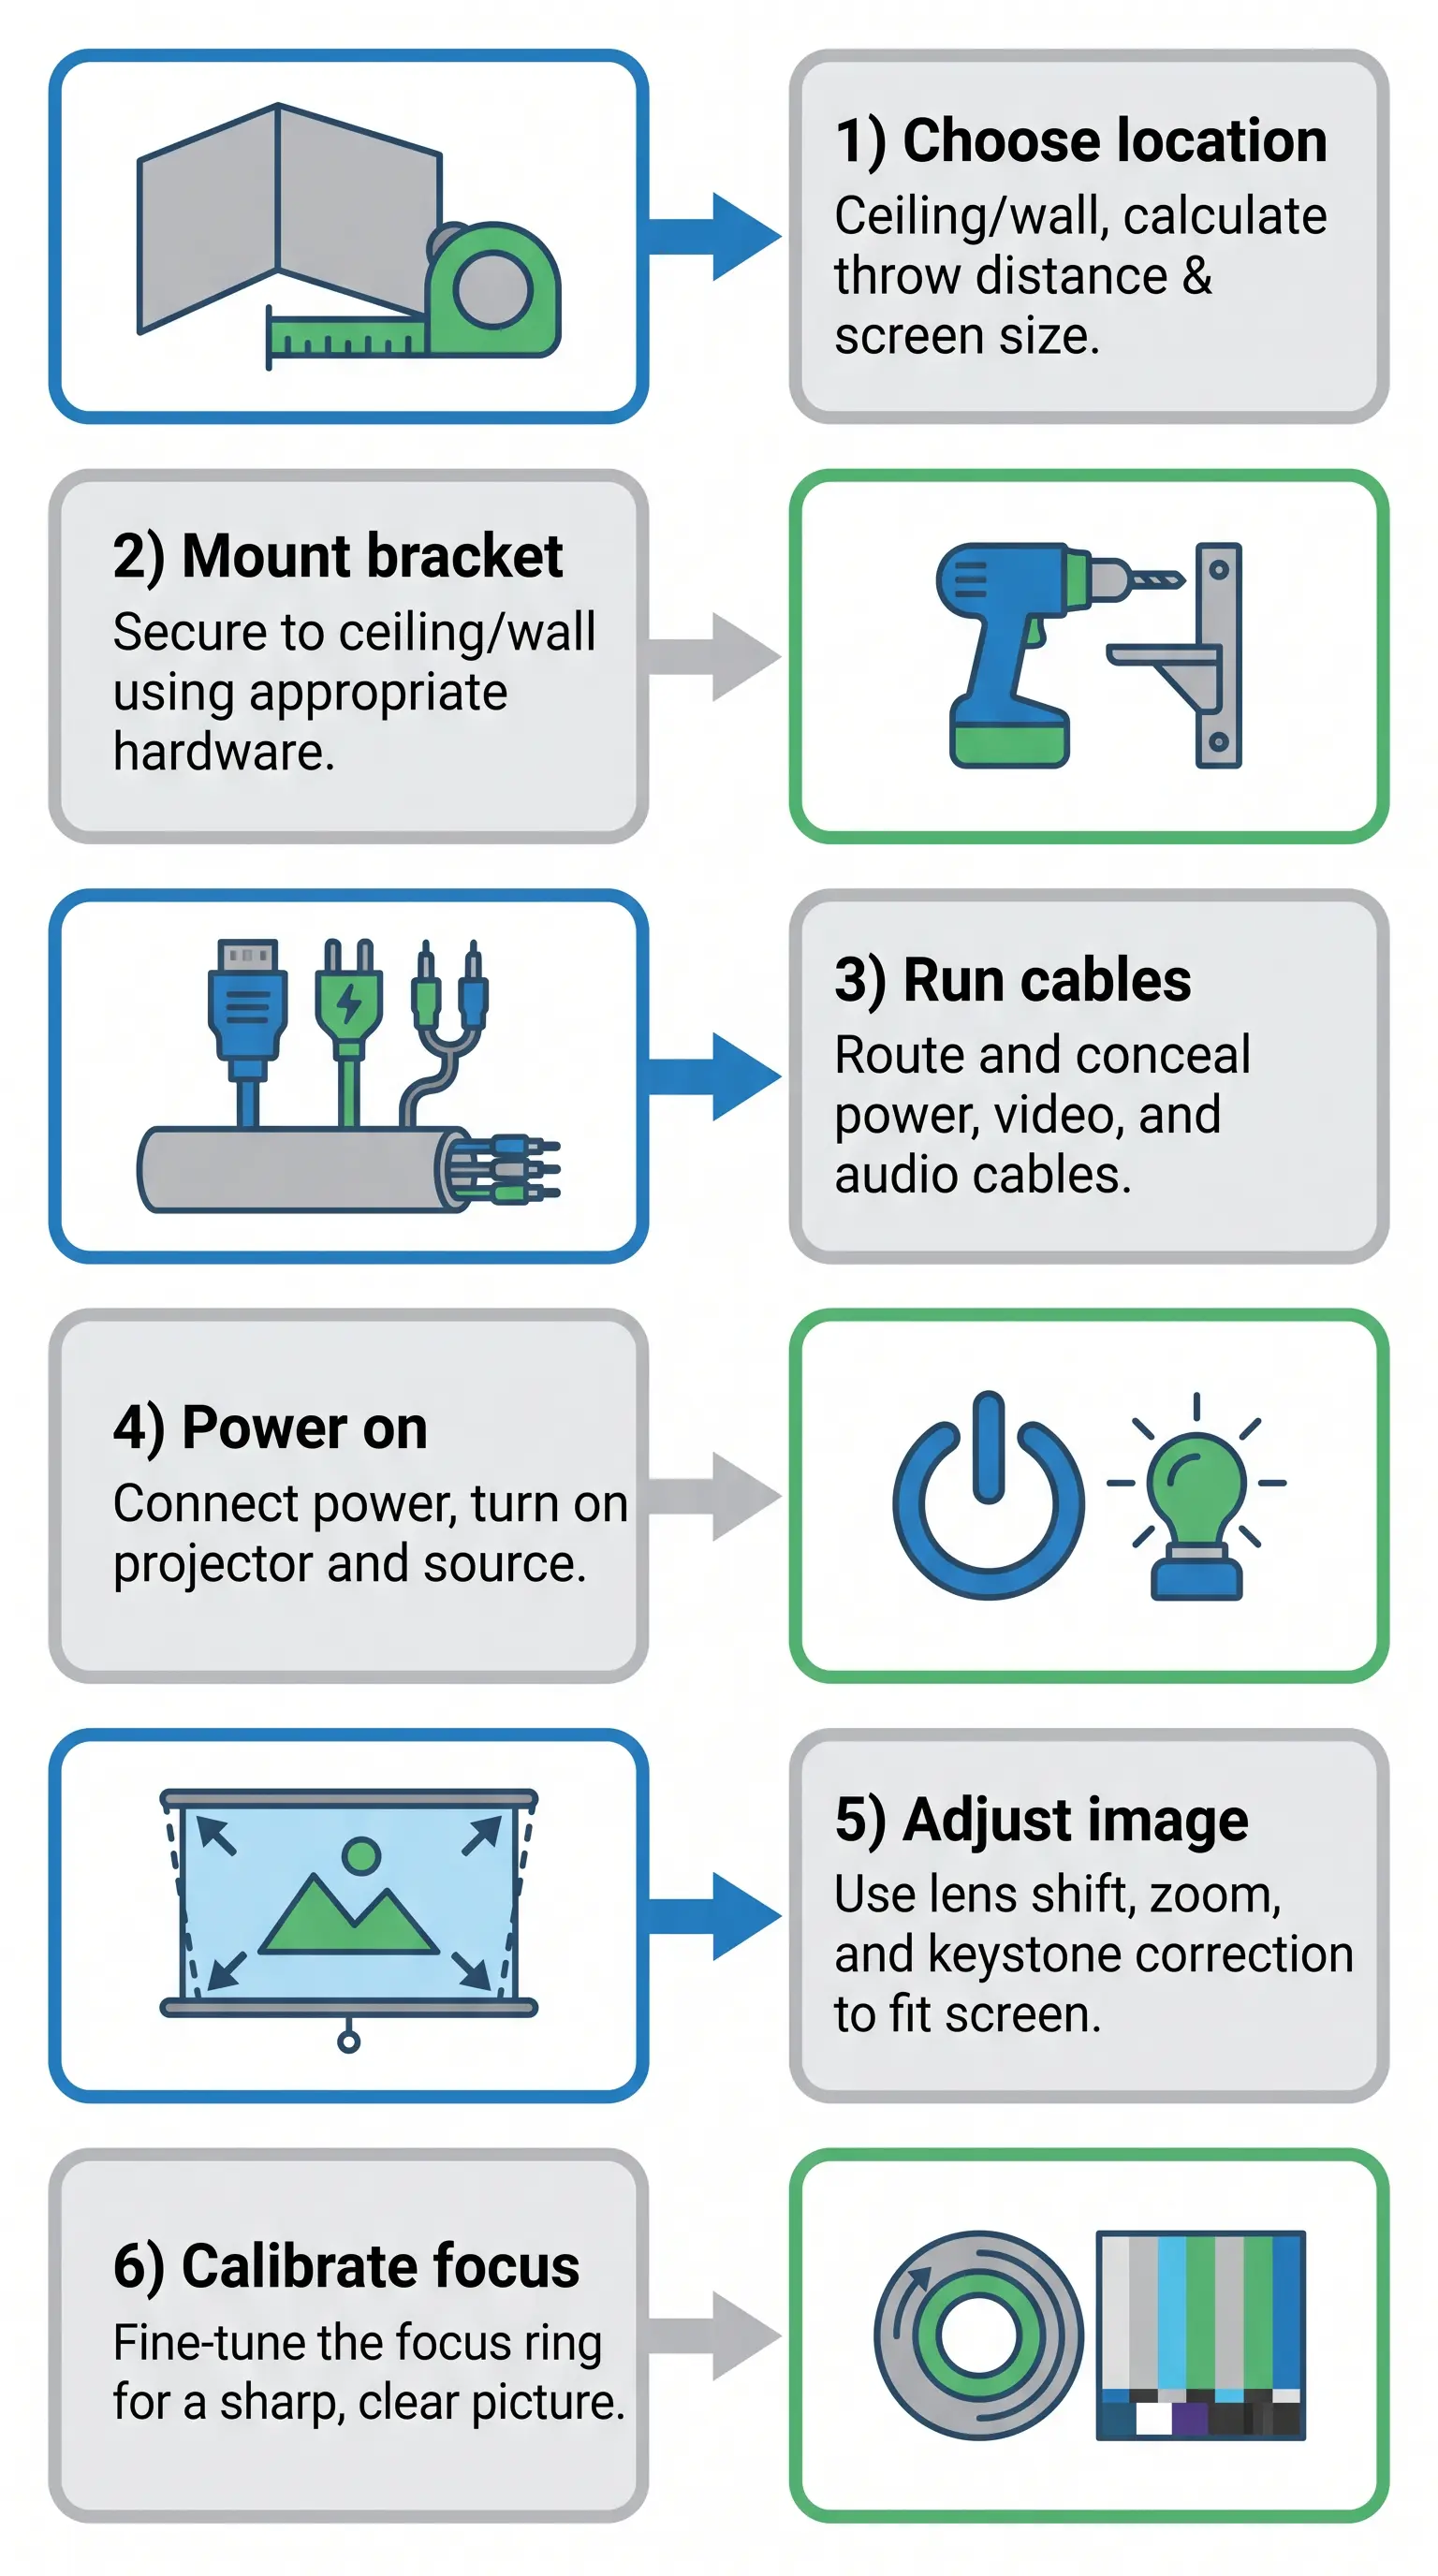
Your projector’s throw ratio dictates where it sits relative to the screen. Measure the distance from the lens to the screen plane and divide it by the desired image width. For rear-projection studio setups, short-throw or ultra-short-throw models (throw ratio below 0.6:1) minimize the required clearance. For front-projection in larger studios, standard throw (1.5:1 to 3:1) offers more flexibility in mounting positions.
According to the Society of Motion Picture and Television Engineers (SMPTE), the recommended screen luminance for studio monitoring falls between 48 and 72 candelas per square meter (cd/m²) under controlled ambient conditions. If your room cannot achieve near-black lighting, you must compensate with higher brightness—typically 1.5x to 2x the baseline lumen requirement.
At DataMax, we have worked with broadcast studios that underestimated throw distance constraints, resulting in image cropping or costly repositioning after installation. Measuring twice prevents re-engineering once.
Step 2: Evaluate Brightness and Light Control
Raw ANSI lumens tell part of the story, but not the whole picture. For studio environments with variable ambient light—such as multi-purpose event spaces or production floors with overhead rigging—a projector rated at 6,000–10,000 ANSI lumens provides sufficient headroom. If your studio operates in near-complete darkness for color-critical work, you can step down to 3,000–5,000 lumens and preserve contrast ratio performance.
Contrast ratio matters more in dark rooms. Look for native contrast (full on/full off) rather than dynamic contrast, which manufacturers inflate in marketing materials. A native contrast of 3,000:1 or higher ensures readable text overlays and subtle shadow detail in video content.
Step 3: Match Resolution and Color Gamut to Content Standards
Your output delivery standard determines the minimum resolution and color space the projector must support:
| Requirement | Full HD (1080p) | 4K UHD | True 4K (DCI) |
|---|---|---|---|
| Minimum Lumens (dark room) | 3,000 | 4,500 | 5,000 |
| Minimum Lumens (ambient light) | 6,000 | 8,000 | 10,000 |
| Rec. 709 Coverage | 95%+ | 98%+ | 99%+ |
| DCI-P3 Coverage | 80% | 90%+ | 95%+ |
| Typical Input Lag | <32ms | <28ms | <20ms |
If your studio produces content for broadcast, aim for Rec. 709 fidelity. For cinema or streaming post-production, prioritize DCI-P3 coverage. High-dynamic-range (HDR) workflows benefit from projectors that support a wider color volume, though true HDR performance on projection remains a developing standard as of 2026 IEEE.
For OEM buyers evaluating bulk orders, note that color calibration consistency varies between manufacturers. Request a pre-ship calibration report and verify that the unit’s Delta E (dE) value stays below 3.0 for color-critical applications.
Step 4: Assess Connectivity and Integration Requirements
Studio workflows demand reliable input flexibility. Confirm the projector supports HDMI 2.1 for 4K60Hz passthrough, DisplayPort 1.4 for computer feeds, and HDBaseT for long-run cable runs in large installations. If you operate legacy equipment, verify composite or component input availability.
For integration with automation systems (Crestron, Extron, Q-SYS), confirm RS-232 or IP control compatibility. Many professional installations require daisy-chained control signals across multiple display devices, so check the projector’s built-in network management capabilities before finalizing your procurement spec.
Step 5: Factor in Procurement and Certification Requirements
If you are ordering through an OEM or ODM partner, clarify minimum order quantities (MOQ), production lead times, and certifications upfront. Most commercial projector manufacturers require MOQs of 50–200 units for custom branding, with lead times of 8–14 weeks depending on component availability. For studio operators seeking rapid deployment, standard SKUs with available stock reduce risk.
Certifications matter for B2B procurement teams working in regulated industries. Confirm the projector carries CE, FCC, and RoHS compliance for EU and North American markets. If your studio operates under broadcast authority oversight, verify that the device meets relevant EMI and safety standards before installation.
By working through these five steps, you eliminate guesswork and anchor your decision in measurable criteria. The next section of this guide covers real-world testing protocols and calibration best practices for studio environments.
Step 6: Establish Testing Protocols and Calibration Standards
Before deploying any projector in a production environment, you must validate performance against your stated specifications. Relying on manufacturer ratings alone introduces risk, especially for color-critical workflows where Delta E deviations can compromise deliverable quality.
Pre-Installation Verification
We recommend running a standardized test sequence on every unit before installation. First, project a grayscale test pattern and measure output with a spectrophotometer at three points: center, 10% in from left edge, and 10% in from right edge. Record luminance variance across these points—if any reading deviates more than 15% from the center value, request a replacement unit SMPTE.
Second, verify input lag using a dedicated tester or software such as Leo Bodnar Lag Tester. For broadcast preview monitors, lag should stay below two frames at your delivery frame rate. For teleprompting applications, sub-frame latency becomes essential to avoid presenter disorientation.
Color Calibration Workflow
After installation, perform full color calibration using a professional probe like the X-Rite i1Display Pro or Datacolor SpyderX. Target these values for studio environments:
| Parameter | Broadcast Standard | Cinema Standard |
|---|---|---|
| White Point | D65 (6500K) | D63 (6300K) |
| Gamma | 2.4 | 2.6 |
| Max Delta E | <2.0 | <1.5 |
| Rec. 709 Coverage | 98%+ | N/A |
| DCI-P3 Coverage | 85%+ | 95%+ |
Schedule re-calibration every 500 operating hours or quarterly, whichever comes first. Lamp-based projectors drift faster than laser units, so factor this into your maintenance budget. Our experience at DataMax shows that laser-phosphor models typically hold calibration for 2,000+ hours with less than 0.5 Delta E shift, reducing recalibration frequency significantly.
Step 7: Design Installation Architecture for Studio Workflows

Proper installation directly impacts projector longevity and maintenance accessibility. Rushing this phase leads to thermal issues, vibration damage, or suboptimal image geometry that costs more to remedy after walls and ceiling tiles are finished.
Mounting and Throw Distance Planning
Calculate your throw ratio using the manufacturer's projection calculator or the formula: Throw Ratio = Distance / Image Width. For studios with limited throw distance, select a short-throw or ultra-short-throw model to avoid presenter shadow interference. We once assisted a client who had selected a standard-throw projector for a 12-foot ceiling only to discover their presenter's silhouette would cross the projection beam during live demonstrations.
Account for lens shift range when determining mounting position. Limited vertical lens shift forces precise height mounting, while horizontal shift flexibility simplifies off-center placement in asymmetrical rooms.
Environmental Control Considerations
Projection systems generate substantial heat—typically 1.5 to 3 kBTU/h depending on brightness class. Ensure your HVAC system handles combined thermal load from all projectors plus audience or talent heat output. Install air filtration in dusty environments, particularly for lamp-based units where dust buildup on optics degrades contrast ratios by up to 30% within six months InfoComm.
Consider acoustic noise ratings if your studio records live audio. Fan noise above 35 dB becomes noticeable in quiet scenes. Laser projectors generally produce less fan noise than lamp-based units at equivalent brightness levels.
Cable Management and Signal Integrity
For runs exceeding 15 meters, use HDBaseT extension or fiber-optic transmission to maintain 4K60Hz signal integrity. Copper HDMI cables beyond this distance suffer bandwidth degradation, resulting in visible artifacts or handshake failures. Label both ends of every cable and maintain a documented infrastructure map—this reduces troubleshooting time during critical production windows.
By establishing rigorous testing protocols and thoughtful installation design, you create a projection system that performs consistently and supports your studio's creative output for years. The final phase involves establishing maintenance schedules and vendor partnerships to protect your investment.
How to Choose the Right Projector for Your Studio: Procurement and Next Steps
With your technical requirements defined and installation architecture finalized, the procurement phase determines whether your studio projection system delivers on its promise. For B2B procurement teams and OEM buyers evaluating options, the selection process extends beyond specifications to encompass vendor capabilities, supply chain reliability, and total cost of ownership.
Evaluation Criteria for Studio Projector Procurement
When comparing proposals from multiple manufacturers, weight these factors according to your studio's priorities:
- Brightness consistency: Verify lumen output at both fresh and end-of-life conditions
- Color accuracy maintenance: Request Delta E drift data over 5,000-hour runtime cycles
- Serviceability: Assess component replaceability and local repair infrastructure
- Firmware update cadence: Manufacturers that release regular updates demonstrate long-term product commitment
- Warranty terms: Extended coverage reduces operational risk for mission-critical installations
For OEM buyers integrating projectors into branded product lines, request a sample evaluation unit to validate spec sheet claims against real-world performance. Most reputable manufacturers offer sample programs with 30-day evaluation windows and credited purchase upon approval.
| Procurement Factor | Standard Terms | DataMax OEM Terms |
|---|---|---|
| Minimum Order Quantity (MOQ) | 50-100 units | 20 units for custom configurations |
| Lead Time | 12-16 weeks | 8-10 weeks with dedicated production slots |
| Sample Policy | 30-day evaluation | 45-day evaluation with engineering support |
| Payment Terms | 30% deposit | Net-30 for qualified accounts |
We recommend scheduling a technical consultation before finalizing purchase orders. Our team at DataMax provides free lumens-per-dollar analysis and throw distance calculations to ensure specification alignment. Contact our B2B sales channel through the request a custom quote portal to begin the evaluation process.
Final Word
Planning Your Studio Projection System for 2026
The studio projection landscape continues shifting toward laser-phosphor illumination, wider color gamut support, and intelligent automated calibration. As 4K content creation becomes standard and 8K workflows emerge in premium production environments, your projector specification must anticipate these requirements. Budget for infrastructure upgrades—HDBaseT and fiber distribution, calibration instruments, and environmental controls—during initial deployment rather than retrofitting later.
Selecting the right projector for studio environments requires balancing technical performance against operational sustainability. Your chosen system must deliver image quality that serves creative work while fitting within maintenance capabilities and budget parameters. DataMax combines manufacturing expertise with direct engineering support to ensure your projection investment performs reliably for years of production use.
Explore our home theater projector lineup for residential studio applications, or connect with our commercial integration team to discuss DataMax OEM services for branded deployments. Ready to specify your studio projection system? Request a custom quote today and receive a detailed evaluation from our technical sales engineers within 48 business hours.
